Welcome to todays blog at the Underwater Photo & Film Academy! Today our subject will be ‘how to make better underwater videos’.
One of the main questions our clients at the Underwater Film Academy ask is
‘how do i make better underwater videos?’
From the GoPro to the notorious RED, regardless of what underwater camera setup you are using, If you want to make better underwater footage and get truly exceptional results when filming underwater, then we start by the first thing you should work on: your lighting.
Working on your underwater lighting.
Underwater, to bring your story to life, more than anything else, you need to know how to use your underwater lights and fully understand how to work with them. Controlling your underwater lighting is the first vital step towards achieving truly cinematic footage.
With typical studio lighting, we have our ‘key light’, which is the main light that lights up the subject.
Then we have the ‘fill light’, that reveals the detail in the shadowy area of the subject.
Next comes the ‘background light’ that lights up the negative space.
And finally, we use the ‘hair light’, which backlights the subject to make it pop out from the background.
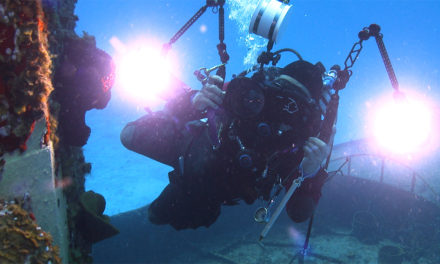
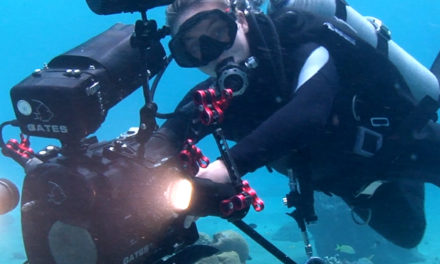
Underwater, when shooting wildlife, you carry both the key lights and fill lights attached to the camera. Yes, 2 lights should be considered minimum. Then you use the ambient light as background lighting. Alternatively, it can even become a hair light if you place the subject against the sun while shooting from underneath.
There are many underwater light options out there so,
How do you choose the best lights for your camera?
How to choose the best underwater lights
1. POWER
Let’s start with power. How bright should the light be?
If you shoot in the tropics, where the ambient light is bright, you need to bring substantial power to make an impact on the scene.
The power or brightness of a light is expressed in lumens. I personally use 15.000 lumens lights. Anything under 6000 lumens will work for macro, but is not going to do the job in wide angle filming.
Lights are super expensive so it is crucial to choose carefully. With an informed decision, you can keep the same lights for many years, even after you upgrade your camera.
2. BEAM ANGLE
Because we use wide angle lenses and get close to the subject, the angle of the beam should be as wide as possible.
Lights with a 160 degree beam work very well.
3. TEMPERATURE
The colour temperature of the lights should be as high as possible.
6000 degree kelvin is good. What would be better would be an underwater light with adjustable colour temperature that could go up to 13 or even 15000 or 17000 kelvin. But we are not there yet.
It’s obvious that if you are shooting wide angle underwater, it is impossible to light the whole scene. So to make great underwater footage, we need to blend the colour temperature given by the artificial light on the foreground with the temperature of the ambient light on the background. The only way to do that is to bring the artificial lighting to a higher colour temperature, so foreground and background mix better together. If you want to dive deeper into colour temperature of lights, you can take a private session with me or follow a course at liquidmotionacademy.com
And this brings us to the next point: filters
4. FILTERS
Having a way to install filters on you lights is highly recommended. Like this, you can modify their colour temperature. Some lights come with a filter thread or a clip on filter holder. If not, then you may have to make one yourself, which is what we do 🙂
5. BATTERY
The battery needs to be user-changeable, for 2 reasons.
Firstly, you may want to have spares so you can change the batteries and keep shooting without having to recharge the light.
Secondly, the first thing that is going to fail on your light is probably the battery pack.
If lights don’t charge up anymore, if you can change the battery pack yourself, it is easy. But the manufacturer seals the battery in many lights, and then you have to ship them back, pay for a repair and the shipping back and forth and possibly even pay some taxes when the lights re-enter your country. In summary, user-changeable batteries are a must have.
6. BURN TIME
Finally, perhaps the most important feature of an underwater light is the burn time.
Most of the underwater video lights out there give a running time of around 50 minutes at full power. This is not enough, especially since during the day you will use your lights mostly on full power.
If you are shooting wildlife, you’ll want to put your lights on at the beginning of the dive,
and turn them off at the deco stop. Having to turn the lights on and off all the time to save power is not an efficient way to shoot wildlife. The animals react when the lights come up suddenly and you may lose the shot.
Which means, you want your lights to run at full power for over 2 hours, not 50 minutes, so you can do a 2 tank morning dive without worrying about your lights failing during the shoot.
So there you go. If you want to make better underwater films and get better results when shooting underwater, get some better lights and work with them on every shot.
If you want to know more about underwater filmmaking from script writing to delivery, subscribe to the Underwater Filmmaking, Photography & Cinematography Youtube channel – youtube.com/liquidmotionfilm.
You can watch a whole podcast on ‘how to make better underwater videos 1’ here: https://youtu.be/nDV-tkOrJ2k
And if you want to learn everything there is to learn about the process of making great underwater movies, you can also signup for one of the online underwater filmmaking courses at the liquidmotionacademy.com.